Various Functions
https://thebookofshaders.com/05/
The Book of Shaders
Gentle step-by-step guide through the abstract and complex universe of Fragment Shaders.
thebookofshaders.com
y = mod(x,0.5); // return x modulo of 0.5
//y = fract(x); // return only the fraction part of a number
//y = ceil(x);  // nearest integer that is greater than or equal to x
//y = floor(x); // nearest integer less than or equal to x
//y = sign(x);  // extract the sign of x
//y = abs(x);   // return the absolute value of x
//y = clamp(x,0.0,1.0); // constrain x to lie between 0.0 and 1.0
//y = min(0.0,x);   // return the lesser of x and 0.0
//y = max(0.0,x);   // return the greater of x and 0.0
위에 GLSL에서 사용할 수 있는 다양한 함수들이 있다.
많이 보던 함수들이기에, 흔하게 보지 못했을 법한 함수들에 대해서만 소개하고 넘어가보자.
fract() 의 경우 소수점부분만을 반환시켜주는데, mod의 몫을 1로 한 결과와 동일하다.
clamp() 는 값을 해당 범위 안으로 한정시켜서 반환시켜주는 것이고 범위를 초과하면 최소 혹은 최대값으로 고정되어 반환된다.
Color
https://thebookofshaders.com/06/
The Book of Shaders
Gentle step-by-step guide through the abstract and complex universe of Fragment Shaders.
thebookofshaders.com
GLSL에서 vector4의 자료형의 각각 축의 값을 접근하기 위한 몇 가지 방법들이 있다.
vec4 vector;
vector[0] = vector.r = vector.x = vector.s;
vector[1] = vector.g = vector.y = vector.t;
vector[2] = vector.b = vector.z = vector.p;
vector[3] = vector.a = vector.w = vector.q;
위와 같은 방식으로 각각의 요소에 접근 가능하다.

void main() {
vec3 yellow, magenta, green;
// Making Yellow
yellow.rg = vec2(1.0); // Assigning 1. to red and green channels
yellow[2] = 0.0; // Assigning 0. to blue channel
// Making Magenta
magenta = yellow.rbg; // Assign the channels with green and blue swapped
// Making Green
green.rgb = yellow.bgb; // Assign the blue channel of Yellow (0) to red and blue channels
gl_FragColor = vec4(magenta, 1.0);
}또 각각의 요소에는 yellow.rg 와 같이 특정 요소들만 지정해서 접근하는 것도 가능하다. 접근에는 특별한 순서나 제한이 없어, yellow.bgb와 같이 접근했던 곳에 또 한 번 접근해서 요소 쌍을 맞추어 사용할 수 있다.
Another great feature of vector types in GLSL is that the properties can be combined in any order you want, which makes it easy to cast and mix values. This ability is called swizzle.
본문에 의하면 이러한 방식을 swizzle이라고 부른다.
Mixing Color
#ifdef GL_ES
precision mediump float;
#endif
uniform vec2 u_resolution;
uniform float u_time;
vec3 colorA = vec3(0.149,0.141,0.912);
vec3 colorB = vec3(1.000,0.833,0.224);
void main() {
vec3 color = vec3(0.0);
float pct = abs(sin(u_time));
// Mix uses pct (a value from 0-1) to
// mix the two colors
color = mix(colorA, colorB, pct);
gl_FragColor = vec4(color,1.0);
}
위 코드를 보면 pct는 sin(u_time)으로 인해 시간에 따라 -1 ~ 1을 오가는데, 이 값이 abs함수로 인해서 0~1의 범위로 제한된다. 이를 mix함수의 매개변수로 넣는데, pct가 0이면 colorA에 해당하는 값이, 1이면 colorB에 해당하는 값이 나온다. pct의 값을 0~1 사이로 조정하면서 얼마나의 비율로 섞을지가 mix()의 역할이다.
#ifdef GL_ES
precision mediump float;
#endif
#define PI 3.14159265359
uniform vec2 u_resolution;
uniform vec2 u_mouse;
uniform float u_time;
vec3 colorA = vec3(0.149,0.141,0.912);
vec3 colorB = vec3(1.000,0.833,0.224);
float plot (vec2 st, float pct){
return smoothstep( pct-0.01, pct, st.y) -
smoothstep( pct, pct+0.01, st.y);
}
void main() {
vec2 st = gl_FragCoord.xy/u_resolution.xy;
vec3 color = vec3(0.0);
vec3 pct = vec3(st.x);
// pct.r = smoothstep(0.0,1.0, st.x);
// pct.g = sin(st.x*PI);
// pct.b = pow(st.x,0.5);
color = mix(colorA, colorB, pct);
// Plot transition lines for each channel
color = mix(color,vec3(1.0,0.0,0.0),plot(st,pct.r));
color = mix(color,vec3(0.0,1.0,0.0),plot(st,pct.g));
color = mix(color,vec3(0.0,0.0,1.0),plot(st,pct.b));
gl_FragColor = vec4(color,1.0);
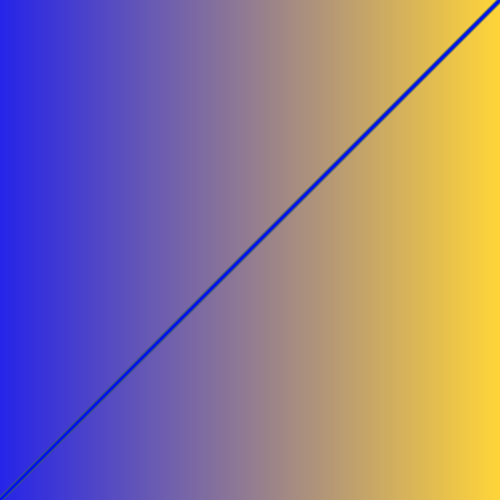
}위 상태에서는 st에 해상도 값이 들어가고, pct에 st.x가 들어가서 color에는 각 st.x값에 따라서 x위치가 0에 가까울 수록 colorA에 가까운 값이 되고, x위치가 1에 가까울 수록 colorB에 가까운 값이 저장되어 colorA에서 colorB로 그라데이션 되는 결과가 나온다.

void main() {
    vec2 st = gl_FragCoord.xy/u_resolution.xy;
    vec3 color = vec3(0.0);

    vec3 pct = vec3(st.x);

    pct.r = smoothstep(0.0,1.0, st.x);
    // pct.g = sin(st.x*PI);
    // pct.b = pow(st.x,0.5);

    color = mix(colorA, colorB, pct);

    // Plot transition lines for each channel
    color = mix(color,vec3(1.0,0.0,0.0),plot(st,pct.r));
    // color = mix(color,vec3(0.0,1.0,0.0),plot(st,pct.g));
    // color = mix(color,vec3(0.0,0.0,1.0),plot(st,pct.b));

    gl_FragColor = vec4(color,1.0);
}
위 코드에서 pct.r에 해당하는 것에 smoothstep으로 x좌표에 따라 값을 추가로 주었다. 그라데이션 색이 조금 불그스름하게 변하였고, 그 정도를 빨간 선으로 시각화하였다.
plot으로 그래프를 그리는데, 여기에 st.x가 보간된 값인 pct.r 값을 그래프로 그려주는 데이터를 red색으로 color에 넣으면서 빨간 색 그래프가 그려진다.

void main() {
    vec2 st = gl_FragCoord.xy/u_resolution.xy;
    vec3 color = vec3(0.0);

    vec3 pct = vec3(st.x);

    pct.r = smoothstep(0.0,1.0, st.x);
    pct.g = sin(st.x*PI);
    // pct.b = pow(st.x,0.5);

    color = mix(colorA, colorB, pct);

    // Plot transition lines for each channel
    color = mix(color,vec3(1.0,0.0,0.0),plot(st,pct.r));
    color = mix(color,vec3(0.0,1.0,0.0),plot(st,pct.g));
    // color = mix(color,vec3(0.0,0.0,1.0),plot(st,pct.b));

    gl_FragColor = vec4(color,1.0);
}
이번에는 pct.g값에 st.x * PI값을 sin()으로 넣었다. 즉 0~PI까지 sin 그래프 만큼의 g컬러를 넣는것으로 그라데이션 색이 또 수정되었다. 이 정도를 또 plot를 이용해 g color 그래프로 그려주었다. 그래프는 sin 함수의 0~PI까지의 모양이 그대로 그려진다.
void main() {
vec2 st = gl_FragCoord.xy/u_resolution.xy;
vec3 color = vec3(0.0);
vec3 pct = vec3(st.x);
pct.r = smoothstep(0.0,1.0, st.x);
pct.g = sin(st.x*PI);
pct.b = pow(st.x,0.5);
color = mix(colorA, colorB, pct);
// Plot transition lines for each channel
color = mix(color,vec3(1.0,0.0,0.0),plot(st,pct.r));
color = mix(color,vec3(0.0,1.0,0.0),plot(st,pct.g));
color = mix(color,vec3(0.0,0.0,1.0),plot(st,pct.b));
gl_FragColor = vec4(color,1.0);
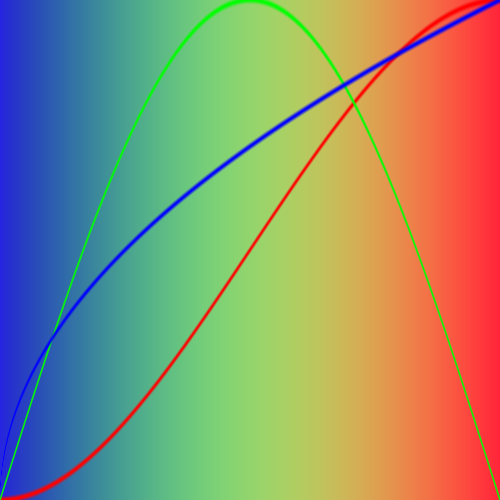
}마지막으로 pow()를 이용해서 st.x값에 따라 거듭제곱형으로 b color가 적용되도록 하였다. 그래프를 그려보면 지수가 0.5인 거듭제곱 그래프의 형태로 전체 그라데이션에 b color를 적용해준다. 이렇게 해서 전체 그래프를 보면 x=0에 가까운 지점에는 b color가 중간에서는 g color가 x=1에 가까운 지점에는 r color가 강하게 color에 적용되는 효과의 그라데이션을 만들 수 있다.
'개발 · 컴퓨터공학' 카테고리의 다른 글
| [Capstone Project] IDEA : 3축 vertex 이동, 광원 환경 세팅 (0) | 2023.02.20 |
|---|---|
| [Capstone Project] 템플릿 vertex 적용 테스트 환경 만들기 - 5 (0) | 2023.02.17 |
| GLSL - Uniform, gl_FragCoord, step, smoothstep (0) | 2023.02.15 |
| SIGGRAPH 시그라프 구경하기 - Learning-Based Bending Stiffness Parameter Estimation by a Drape Tester (0) | 2023.02.14 |
| [Capstone Project] 템플릿 vertex 적용 테스트 환경 만들기 - 4 (0) | 2023.02.13 |


