
이전 포스팅에서 particle에 대해 hashing기법으로 처리하는 방법을 주로 2차원에서 알아보았다. 실제 코드로 적용될 때는 3차원 공간상에서 진행된다
Hash table 만들기 과정
export class Hash {
...
create(pos: Float32Array) {
const numObjects = Math.min(pos.length / 3, this.particleMap.length);
// Init arrays with 0. Our job is to fill these in.
this.cellCount.fill(0);
this.particleMap.fill(0);
// Step 1: Count
// Hash and iterate integer at index in arraycellCount
for (let i = 0; i < numObjects; i++) {
const h = this.hashPos(pos, i);
this.cellCount[h]++;
}
// Step 2: Partial sums
// Mutate cellCount array to contain partial sum of all elements before current index
let start = 0;
for (let i = 0; i < this.tableSize; i++) {
start += this.cellCount[i];
this.cellCount[i] = start;
}
this.cellCount[this.tableSize] = start; // guard by adding an additional element at the end
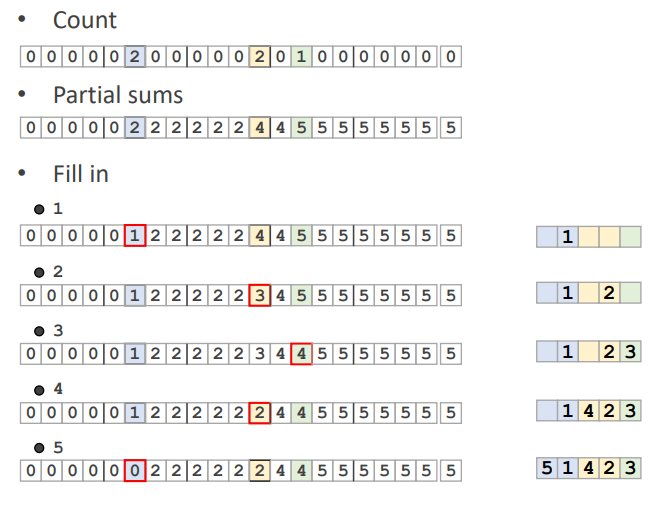
// Step 3: Fill in objects ids
// Now finally fill in the particle array, particleMap
for (let i = 0; i < numObjects; i++) {
const h = this.hashPos(pos, i);
this.cellCount[h]--;
this.particleMap[this.cellCount[h]] = i;
}
}
...이전 포스팅에서 다루었던 hash table을 구조를 만드는 과정이 위 hash class의 create 함수에 담겨있다
위 count, partial sums, fill in 세 과정이 각각 step 별로 코드화 되어있다
initialize
const numObjects = Math.min(pos.length / 3, this.particleMap.length);

// Init arrays with 0. Our job is to fill these in.
this.cellCount.fill(0);
this.particleMap.fill(0);
먼저 initialize부분을 보자
numObjects라는 것은 particle의 개수라고 봐도 무방하다
각 cell들과 particle map을 0으로 초기화한다

cellCount는 particle이 있는 table을 일렬로 늘어놓고 1을 추가한 배열이고
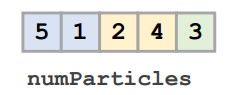
particleMap은 전체 particle들을 뽑아서 담아놓은 배열이다
step 1: count
// Step 1: Count
// Hash and iterate integer at index in arraycellCount
for (let i = 0; i < numObjects; i++) {
  const h = this.hashPos(pos, i);
  this.cellCount[h]++;
}
첫 단계에서 particle들의 position을 가지고 hash 배열을 만든다
cellCount의 각 hash 위치에 카운트 해주고
  hashPos(pos: Float32Array, nr: number) {
    return this.hashCoords(
      this.intCoord(pos[3 * nr]),
      this.intCoord(pos[3 * nr + 1]),
      this.intCoord(pos[3 * nr + 2])
    );
  }

  hashCoords(xi: number, yi: number, zi: number) {
    const h = (xi * 92837111) ^ (yi * 689287499) ^ (zi * 283923481); // fantasy function
    return Math.abs(h) % this.tableSize;
  }
hash를 만드는 함수는 이와 같다 임의의 소수를 곱하고 XOR 연산해서 tableSize로 모듈러하는
그런식의 hashing 기법을 써서 hash 값을 만든다
step 2: partial sums
// Step 2: Partial sums
// Mutate cellCount array to contain partial sum of all elements before current index
let start = 0;
for (let i = 0; i < this.tableSize; i++) {
  start += this.cellCount[i];
  this.cellCount[i] = start;
}
this.cellCount[this.tableSize] = start; // guard by adding an additional element at the end
cellCount를 가지고 partial sums를 구하는 단계이다

partial sums는 이렇게 단순히 count를 뒤의 인덱스로 가면서 누적시킨 것이다
step 3: fill in objects ids
// Step 3: Fill in objects ids
// Now finally fill in the particle array, particleMap
for (let i = 0; i < numObjects; i++) {
  const h = this.hashPos(pos, i);
  this.cellCount[h]--;
  this.particleMap[this.cellCount[h]] = i;
}
각 particle의 hash 위치 cellCount를 하나 빼고
particleMap에서 cellCount 위치에
해당 particle의 index \(i\)를 넣는다

이 부분이 좀 헷갈릴 수 있으므로 그림을 보며 잘 매칭시키자
이렇게 세 단계를 통해 hash를 이용한 particleMap을 생성하였다
Hash query
hash class에는 query라는 함수가 있는데 어디서 활용되는 걸까
cloth simulation의 self collision에서
particle이 서로 겹치게 되는 상황인지의 여부를 계산하는 단계를 hash query에서 진행한다
query는 일련의 단계이고 각 particle에 대해서 인접 particle이 얼마나 있는지 검토한다
  query(pos: Float32Array, nr: number, maxDist: number) {
    const x0 = this.intCoord(pos[3 * nr] - maxDist);
    const y0 = this.intCoord(pos[3 * nr + 1] - maxDist);
    const z0 = this.intCoord(pos[3 * nr + 2] - maxDist);

    const x1 = this.intCoord(pos[3 * nr] + maxDist);
    const y1 = this.intCoord(pos[3 * nr + 1] + maxDist);
    const z1 = this.intCoord(pos[3 * nr + 2] + maxDist);

    this.querySize = 0;

    ...
query 함수는 position과 particle의 index(nr), 반경(maxDist)을 input으로 받는다
우선 xyz0과 xyz1로 범위 양 끝을 잡는다
querySize는 인접한 particle의 개수를 담게 될 것이다
query(pos: Float32Array, nr: number, maxDist: number) {
    ...

    for (let xi = x0; xi <= x1; xi++) {
      for (let yi = y0; yi <= y1; yi++) {
        for (let zi = z0; zi <= z1; zi++) {
          const h = this.hashCoords(xi, yi, zi);

          // Looking for a difference between two, like in slides
          const start = this.cellCount[h];
          const end = this.cellCount[h + 1];

          // If there is a difference, this cell has particles !
          // Save to queryIds
          for (let i = start; i < end; i++) {
            this.queryIds[this.querySize] = this.particleMap[i];
            this.querySize++;
          }
        }
      }
    }
  }
이후 3차원의 한 칸씩 위치를 탐색하면서 hash좌표를 가져온다
hash 좌표와 그 다음 좌표에 cellCount가 각각 인지 start, end에 담는데
이는 \(end-start\)값으로 해당 hash 좌표에 particle이 몇 개인지 알아내는 방법이다

코드에서는 개수를 파악하기보단 cellCount 값을 가지고
particleMap에서 particle의 id를 알아내서 queryIds에 담는다
위 그림에서는 cellCount 1을 가지고 particle 4를 찾아서 queryIds에 담는다
  // If there is a difference, this cell has particles !
  // Save to queryIds
  for (let i = start; i < end; i++) {
    this.queryIds[this.querySize] = this.particleMap[i];
    this.querySize++;
  }
굳이 이렇게 start에서 end까지 반복문을 돌리는 것은
같은 hash좌표에 여러 particle이 있는 경우에 모두 queryIds에 넣기 위해서이다
Hash queryAll
queryAll은 각 particle에 대해서 query를 실행하는 것이다
그래서 queryAll을 통해 hash query가 어느 시점에 호출되느냐
export class ClothPhysicsObject extends PhysicsObject {
...

  preIntegration(dt: number) {
    this.hash.create(this.positions);
    this.hash.queryAll(this.positions, ((1 / 60) * 0.2 * this.thickness) / dt);
  }
cloth physics object class의 preIntegration에서 호출된다
pre integration이라 함은
solve 과정을 실행하기 전에 particle들에 대해 hashing table을 만들고
인접 particle들에 대한 목록을 query에 담아놓는 것이다
그렇다면 query가 preIntegration 단계에서만 사용되는 것에 의문이 생기는데,
만약 particle simulation 중 fluid 유체 시뮬레이션이었다면 adjacent particle이 프레임마다 계속해서 바뀌지 않나?
라는 의문이 있었다
다만 여기서는 cloth simulation이니 particle의 인접관계가 변형되지 않는다고 가정하기 때문에
pre integration과정에서 한 번만 query를 실행하는 것 같다
  queryAll(pos: Float32Array, maxDist: number) {
    let idx = 0;
    const maxDist2 = maxDist * maxDist;

    for (let i = 0; i < this.maxNumObjects; i++) {
      const id0 = i;
      this.firstAdjId[id0] = idx;
      this.query(pos, id0, maxDist);

      // If particles found in query, register them in adjIds
      for (let j = 0; j < this.querySize; j++) {
        const id1 = this.queryIds[j];
        if (id1 >= id0) continue;
        const dist2 = vecDistSquared(pos, id0, pos, id1);
        if (dist2 > maxDist2) continue;
        if (idx >= this.adjIds.length) {
          const newIds = new Int32Array(2 * idx); // dynamic array
          newIds.set(this.adjIds);
          this.adjIds = newIds;
        }
        this.adjIds[idx++] = id1;
      }
    }
    // Manually set the last extra space with current idx
    this.firstAdjId[this.maxNumObjects] = idx;
  }
모든 particle들에 대해서 index 순서대로 query를 실행한다
  getAdjacentParticles(id: number) {
    const start = this.firstAdjId[id];
    const end = this.firstAdjId[id + 1];

    return this.adjIds.slice(start, end);
  }
firstAdjId 배열과 adjIds는 인접 particle을 구하는 함수인 getAdjacentParticles에 사용되는데
추후에 알아보자
      for (let j = 0; j < this.querySize; j++) {
        const id1 = this.queryIds[j];

        // Skip if id1 > id0, to ensure we only execute the following code once
        // Skip if id1 == id0 since a particle can't be adjacent to itself
        if (id1 >= id0) continue;

        // Calculate distance-squared between two particles
        // We do not use square root to save ourselves
        // from the expensive calculation. We just want
        // to compare with maxDist2
        const dist2 = vecDistSquared(pos, id0, pos, id1);

        if (dist2 > maxDist2) continue;
        // else intersect!
particle에 query가 있으면
해당 query에 담긴 인접 particle id와 현재 보고있는 particle id를 비교해서
두 particle의 거리가 기준 반경보다 작으면 intersect 겹친 것이라고 판단한다
겹치면 어떻게? 밀어내야한다
밀어내는거야 solve에서 처리할테니 인접했다고 알려주는 역할을 하면 된다
        if (idx >= this.adjIds.length) {
          const newIds = new Int32Array(2 * idx); // dynamic array
          newIds.set(this.adjIds);
          this.adjIds = newIds;
        }
        this.adjIds[idx++] = id1;
여기서 인접한 particle의 id를 adjIds에 저장하는데
아까도 그렇고 firstAdjId와 adjIds의 역할이 어렵다
    // Keep track of where to first index into adjIds
    // so firstAdjId[id] = idx for adjIds
    this.firstAdjId = new Int32Array(maxNumObjects + 1);

    // All particle ids adjacent to a particular id packed into a dense array.
    // Use firstAdjId[id] to access.
    this.adjIds = new Int32Array(10 * maxNumObjects);
코드는 생성자의 일부이다
firstAdjId는 해당 particle id에 인접한 particle id를 하나만 저장해두고
adjIds에서 그 하나를 가지고 나머지 인접 particle들을 알아두기 위해서 이렇게 저장해놓은 것 같다
왜 adjIds가 particle 개수의 10배나 많은지는 의문이다 그냥 길이가 많이 필요해서 10배 늘린 것 같다
실제로 동적으로 늘리기도 하는 걸 보면 그렇다


